HDR Light Studio 1.5 Review
12/10/09 09:19
by Albert Kiefer | Visual Designer | Venlo
The developers at HDR LightStudio have just released version 1.5 and I was very quick to buy it. Too bad it's still PC only since I work mainly on the Apple Macintosch platform. But since there are some essential packages that run exclusively on the PC I have a PC just for that purpose as well.
I have eagerly anticipated this new release of the software. I ordered my copy yesterday and even after playing just a very little while with it I am totally blown away with it. There will be no turning back now.
What does it do?
So what does HDR Light Studio actually do? In essence it is a kind of interactive HDR image composer. Anybody working with 3D software for visual design, product presentations, product visuals, etc will have worked with High Dynamic Range Images on occasion. HDR images contain a much higher level of image information than normal texturemaps. This extra information can be put to good use in Image based rendering programs like Hypershot, 3D Studio Max, Cinema 4D, Maya, Houdini and many more.
HDR Lightstudio enables you to interactively create your very own HDR studio images by placing light sources from a library on a virtual environment that is then mapped out to a flat image that can be rendered as an .HDR file or .EXR file format.
Creating flexible and complex lighting setups in HDR Light Studio 1.5 is very easy with the realtime feedback interface.
How does it do it?
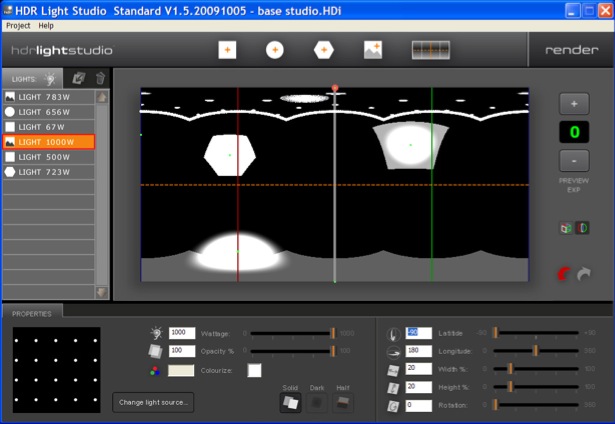
When you start up HDR Light Studio you are presented with a fixed windo layout that has an area where you can compose the HDR image. This image area is basically the flattend projection of either a cube face or spherical environment. Left of the working area is the light or objects list that contains the current items that are mapped onto your environment in order of their creation (bottom item was created first and higher items in the stack created later.
The bottom row area contains information about the currently active light object. It shows the position attributes of the current light on the map and a whole section of light attributes like size, color, falloff, transparency. Every time you select another object from the items list you get direct parameter feedback in the information area.
Adding a new light object is as easy as clicking one of light icons in the top row of the interface. You have a choice of three procedural light types: round, rectangular and hexagon. There is also a fourth category which is image based. Here you can pick from a preset library of (HDRI) photographic light sources that were created from real world studio references and some that are more abstract. This type of light is available in the form of HDRI Light Packs that are available for purchase. Beware that the basic version of HDR Light Studio does not support this type of light though! the Standard and Pro versions of the software do support this image type and come pre bundled with a small set of LightPack images. More of these add on Lightpacks can be bought on-line soon.
You even have the choice to work with dark lights which remove light from an area of the image.
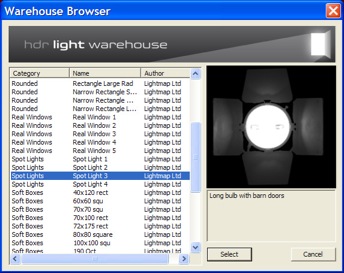
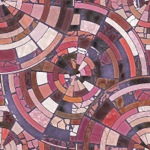
The HDR Light Studio 1.5 warehouse browser quickly show real world HDR based lighting objects
How does it feel working with it?
Working with HDR Light Studio 1.5 is a breeze. It just does its thing really well and give you results very fast. There is no guess work since feedback is instantaneous. You can choose to drag your light source into position on the mapped layout or enter values numerically as you watch the selected light object jump exactly into the correct position.
You are always in control. The really cool thing is to see the automatic projected deformation when you drag you sources around. When something is mapped onto a sphere it distorts based on its location relative to the spherical layout and HDR Light Studio does that all in realtime.
Is there room for improvement?
Sure there is. HDR Light Studio could even be much more of a killer application than it already is by adding some features that strangely lack from this version but should be in there.
First some interface improvements. Currently the window is a fixed layout that surprised me a bit in this large screen display era. I would have expected to be able to drag my interface to fully fit my screen area or maximize it with a single click. Unfortunately it was not possible. Nothing really bad but still. Being able to work larger makes placing elements a lot more under my control even when I prefer to drag around.
Another small interface glitch is that the cursor always remains the iconic text cursor which is funny since, apart from editing values, nothing here is text based. It should be a small effort to make the cursor change according to its current function. And talking about cursor behaviour: please make it possible to direct select light objects in the layout area (right mouse click or whatever). It's a bit of a nuissance to have to go to the list and do it there since sometimes you may have guessed wrong and selected the wrong one.
Having the Abillity to enter name tags to lightsources would also be welcome as an organizational means.
Feature wise there are some small but very nice additions that would really put some icing on an an already very tasty cake.
Very first on the list would be the ability to change the stacking order of the light list. Sometimes I have added a light earlier but would like a new lightsource to be behind that light. Now there no way to actually swap things layer wise. You have to delete all the layers and then rebuild. A simple way to drag the layer stack items around (Photoshop, etc) would solve this.
Another good addition would be the ability to add procedural light arrays. Suppose I want a ceiling made up of an array of 3 rows of ten lights each, or a grid of 4 by 4 lights. Impossible now but would be a nice and welcome addition.
Last, and probably not so easy to do, would be the addition of a preview area where you can see a realtime render of an object ( with selectable material properties) that is lit by the HDR map that you are building. In the current age of high performance systems that is not an impossible feat (look at Hypershot and the general trend towards more realtime rendering solutions with instant feedback). After all you make an HDR map to actually control your rendered 3D scene in a very substantial way and having more of a predictive overview of the map you are building will greatly enhance its effectiveness.
Where can you get it?
You can download a demo version of HDR Light Studio or you can immediately buy your copy in one of the available flavours here.
The prices range from a very acceptable 149 UK Pounds for the 1.5 Basic version to 299 UK Pounds for the Standard version to 499 UK pounds for the Pro version. Being able to author your own custom HDRI lighting rigs will save you money and allow you the flexibility of finetuning the maps for every new project. If you do 3D visualizations for products that require studio lit environments this will, in any form, repay itself quickly.
Update
I was just contacted by company CEO Mark Segasby of HDR Light Studio and friendly pointed to a couple of oversights on my part. Firstly you can select lights by using the Up and DOWN arrow keys to move through the list of lights in the scene. Although this may be practicle for some it still forces you through a serial way of cycling through your objects and it does not offer much benefit over the selection in the left objects list. Direct selection is just more practical and a lot more direct and faster.
The second remark is points to the fact that once you issue a "command-left SHIFT-Up or DOWN arrow" key command you can actually change the stacking order of the light objects.
Indigo Renderer Review
03/08/09 11:11
Indigo renderer
fantastic rendering engine to drive mainstream software
by Albert Kiefer
Hadn’t it been for my colleagues at VizWorld I would not have heard from this nice little gem of a renderer. But everything that spans all mainstream platforms and plugs into the general 3D software packages has my immediate interest. It is always a good idea to be flexible with the images you can generate and having an alternative renderer, and a great one too, is a good addition to the toolbox of any visualization artist.
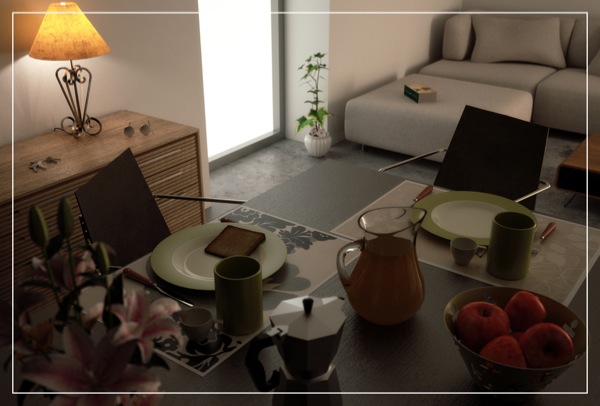
image credit Filippo Scarso
What it is
Indigorenderer is a rendering engine. As such it’s always going to be dependent on software that exports files in a format it can read in order to generate an image. Obviously there are already some really great engines out there like VRay (my main workhorse) Brazil, Mental Ray, Maxwell Render and of course one of the mainstay long time studio favorites: Renderman. So why even look at Indigo? Well, for one thing there’s the quality of the images. Looking at the galleries on their website you can get a sense of what this renderer is capable of. But more importantly is what software packages it supports and what platforms. This is obviously a two way benefit since the more software and platforms are supported, the wider the target customer base will be.
Working with Indigo Renderer
I downloaded the software a few days ago and installed it without any problems. There are some test scenes avaialable to get that first ‚accomplisment’ factor going but that was a bit of a let down because most of the files in that folder were technical and esoteric scenes that a layman can’t make any sense of. I’d encourage the New Zealand developers of Indigorenderer to pack some great example files that will immediately show any prospective client what this renderer can do.
Since this is a stand alone rendering engine the next step is to install the plug-in for your particular package. In my case I downloaded and installed the Mac version of plug-ins for Sketchup Pro and for Cinema 4D.
The first thing I noticed is that the Cinema 4D plug-in is not 64bit so I had to start my software in 32bit mode to test it (normally, when I work with very heavy scenes this is obviously an impossible scenario which would prevent me from even using Indigo as a viable production renderer).
The Sketchup Pro installation was as straightforward as the Cinema installation and it was really exciting to see how fast you can get really great images out of Sketchup this way. So right here and now a very powerful forte for Indigo is the connection to Sketchup that enables architects to produce some great imagery without knowing much of the rendering process involved behind the scenes of Indigo.
When I tried to dig deeper I stumbled on things that are obviously still under developed issues of their plug-ins.
Plug-in or Break
Any external renderer is made or broken with the success of integration into their host package. This is no different for Indigo. And it’s here where the company will still need to do serious work. The plug-ins that I have worked with (for C4D and Sketchup) were very basic (with the Sketchup version a little ahead of it’s C4D cousin in terms of features). It’s great to have a powerful renderer at one’s disposal but if all this power is hidden behind a wall of technical knowledge, only very die hard artists will work with it and create winning images. If, on the other hand, the technology is made available in a user friendly way there is a whole host of people that could employ this renderer and make incredibly convincing images direct from the most unexpected packages like Sketchup, which normally doesn’t do more than do a nice flat shaded version of a 3D scene.
One example is the image I saw on the indigo site from an Italian artist that shows how Sketchup can turn into a deadly weapon with Indigorenderer as rendering ammunition. You can see that one in the opening of this review.
It is vital that Indigorenderer becomes more sophisticated in the way it allows users to easily set up materials and lights in their host packages. This will sometimes mean better integration into the host workflow (Cinema 4D, Blender, Max, etc. which already have a very well established material and lighting workflow in place) or create an elegant and easy to use new workflow for packages that have none, or underdeveloped workflows in place (like Sketchup in this case).
Image Quality
The image quality can be quite superb if you let the renderer either work long enough (think in multiple hours here) or make use of the network capabilities of the renderer that allow you to grab processors on your local network. If the renderer is given too little time the images can be on the noisy side. You can also send your project to a renderfarm for the final high res rendering and get it back at a fraction of the cost in time it would take on single or small number of local machines.
What’s Up Doc?
The documentation for both renderer and plug-ins is very sparse. There are some nice Sketchup step by steps wich will get you up and running fast but for serious work and people trying to understand more of what’s going on and how to control the software it’s vital to have a bit more material to document themselves with.
Conclusion
All in all this is a great renderer, especially for users of a package like Sketchup that has a very barebones system in place Indigorenderer will blast yoou to much more succesful presentation quality images. For Indigorenderer to compete with the likes of VRay and Maxwell Render, two of the competing brands it has to put a but more pollish and beef on the plug-ins and documentation, create a better material editor that works together with the host and allows for easier material exchanges (the Cinema 4D mac plug-in crashed several times on importing materials from the web database) and keep development equal on the platforms (Mac 64bit!).
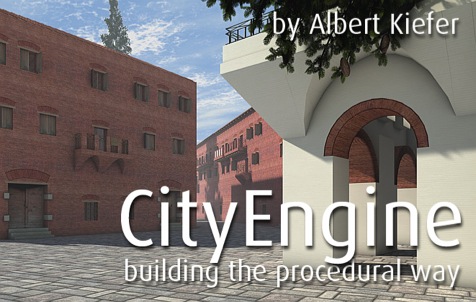
CityEngine Review
26/07/09 12:31
CityEngine
Incredibly powerful urban habitation modeling tool
by Albert Kiefer
Both in Architectural visualizations, in certain games situations but also in archeologic reconstructions it is sometimes inevitable to create or recreate an urban environment. A habitated area that shows human presence. Historically this habitation grows from a number of conditions present at a certain geographic location such as a path, a road, a river, etc. People will start settling in places like these and build houses and streets along trading routes that establish themselves in a village that evolves into a town and than maybe into a huge metropolitan city.
Swiss company Procedural have developed a software specifically for this purpose and it’s doing a fantastic job at it. However it’s not your regular easy drag and drop type of software. Obviously CityEngine does provide a great drag and drop functionality. It supports this by dragging rules based procedures to pre-selected surface areas. But it is by no means a software for the casual user. Obviously at its price point starting at 3450 US Dollars (there is an educational license for just 695 US Dollars), this software is not intended for the casual user but for professionals in the architecture, games, film, archeologic and general visualization companies for which the seemingly steep pricing is not a problem since the software will earn itself back very quickly.
Procedurally Structured
So how does CityEngine work its magic? Well it starts more or less the same way a city develops over time. So basically it starts from simple road network. You can for example import xml, dxf data from any source (like openstreetmap.org) and start building from these street networks, or you can have CityEngine generate a network for you based on a series of procedural rules.
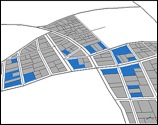
After the network is generated you can command CityEngine to draw lots between those streets. These can be subdivided further in smaller lots. After this process of subdivision is complete (you can, by selecting areas, constrain the generation of lots to areas you like) CityEngine can start drawing buildings onto each individual lot or to sets of lots that you pre select. This process is very straightforward and in no time you have created a very convincing urban area with lots of different buildings.
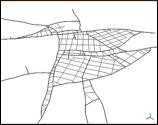
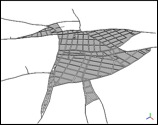
from basic street network to elaborate lot subdivision is just a simple three click process
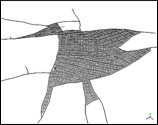
Now generating networks of streets and subdividing the areas between these streets with small lots of ground is nice. But obviously there, where the houses start to build themselves is where the real CityEngine magic starts to work. CityEngine does this by a procedural modeling language and they have called this modelling structure the Shape Grammar. In the shape grammar of a particular building they write down a set of rules that geometry, and even texturemaps, will behave to depending on a specific situation. This way you can create stunningly adaptive buildings that seems to just know how to behave under certain conditions.

a section of shape grammar code next to a building (might not be the building for this code)
Make a building taller and it automatically adds new floors to compensate for the extended height. Make it wider and the structure adds more windows to avoid large blind walls.
In their free 30 day demo version they have a set of shape grammar scripts to recreate the Petronas Towers, the Parthenon and the Candler building. That way you can start to dissect how to work with this procedural scripting language.
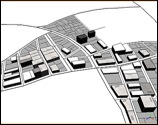
by selecting subdivided lot sections each can be assigned instructions via shape grammar rules
CityEngine is very powerful for games development too because it can simultaneously generate different levels of details (for instance for distant buildings in relation to a player, or for a simpler collision detection geometry model). And it can export in a variety of formats for popular games engines.
All in all CityEngine is a very powerful package for modeling and simulating urban civilizations. They have even done a great job of rebuilding ancient Pompei (take a look at that movie here). It’s even a great conceptual tool for quickly investigating different massing and shape strategies by architects. But it is certainly not for the casual user. They have now expanded their terrain to include a Mac version as well but I have had serious issues with both the graphics engine and professional Mac video card (ATI Radeon X1900 XT with 512Mb Vram) and also Mac formatted xml files exported from open streetmap (it just does not read them because of a different file naming structure. In my case I had to disable the CityEngine shader on my MacPro 8 core Xeon system because it basically stopped interacting with even a one house shaded setup.
I can even very well see a lower cost version being developed that will sell based on selling rules sets for buildings and simulated streets and lots in a more consumer oriented way wich will certainlly find its way to broader user base.
Incredibly powerful urban habitation modeling tool
by Albert Kiefer
Both in Architectural visualizations, in certain games situations but also in archeologic reconstructions it is sometimes inevitable to create or recreate an urban environment. A habitated area that shows human presence. Historically this habitation grows from a number of conditions present at a certain geographic location such as a path, a road, a river, etc. People will start settling in places like these and build houses and streets along trading routes that establish themselves in a village that evolves into a town and than maybe into a huge metropolitan city.
Swiss company Procedural have developed a software specifically for this purpose and it’s doing a fantastic job at it. However it’s not your regular easy drag and drop type of software. Obviously CityEngine does provide a great drag and drop functionality. It supports this by dragging rules based procedures to pre-selected surface areas. But it is by no means a software for the casual user. Obviously at its price point starting at 3450 US Dollars (there is an educational license for just 695 US Dollars), this software is not intended for the casual user but for professionals in the architecture, games, film, archeologic and general visualization companies for which the seemingly steep pricing is not a problem since the software will earn itself back very quickly.
Procedurally Structured
So how does CityEngine work its magic? Well it starts more or less the same way a city develops over time. So basically it starts from simple road network. You can for example import xml, dxf data from any source (like openstreetmap.org) and start building from these street networks, or you can have CityEngine generate a network for you based on a series of procedural rules.
After the network is generated you can command CityEngine to draw lots between those streets. These can be subdivided further in smaller lots. After this process of subdivision is complete (you can, by selecting areas, constrain the generation of lots to areas you like) CityEngine can start drawing buildings onto each individual lot or to sets of lots that you pre select. This process is very straightforward and in no time you have created a very convincing urban area with lots of different buildings.
from basic street network to elaborate lot subdivision is just a simple three click process
Now generating networks of streets and subdividing the areas between these streets with small lots of ground is nice. But obviously there, where the houses start to build themselves is where the real CityEngine magic starts to work. CityEngine does this by a procedural modeling language and they have called this modelling structure the Shape Grammar. In the shape grammar of a particular building they write down a set of rules that geometry, and even texturemaps, will behave to depending on a specific situation. This way you can create stunningly adaptive buildings that seems to just know how to behave under certain conditions.
a section of shape grammar code next to a building (might not be the building for this code)
Make a building taller and it automatically adds new floors to compensate for the extended height. Make it wider and the structure adds more windows to avoid large blind walls.
In their free 30 day demo version they have a set of shape grammar scripts to recreate the Petronas Towers, the Parthenon and the Candler building. That way you can start to dissect how to work with this procedural scripting language.
by selecting subdivided lot sections each can be assigned instructions via shape grammar rules
CityEngine is very powerful for games development too because it can simultaneously generate different levels of details (for instance for distant buildings in relation to a player, or for a simpler collision detection geometry model). And it can export in a variety of formats for popular games engines.
All in all CityEngine is a very powerful package for modeling and simulating urban civilizations. They have even done a great job of rebuilding ancient Pompei (take a look at that movie here). It’s even a great conceptual tool for quickly investigating different massing and shape strategies by architects. But it is certainly not for the casual user. They have now expanded their terrain to include a Mac version as well but I have had serious issues with both the graphics engine and professional Mac video card (ATI Radeon X1900 XT with 512Mb Vram) and also Mac formatted xml files exported from open streetmap (it just does not read them because of a different file naming structure. In my case I had to disable the CityEngine shader on my MacPro 8 core Xeon system because it basically stopped interacting with even a one house shaded setup.
I can even very well see a lower cost version being developed that will sell based on selling rules sets for buildings and simulated streets and lots in a more consumer oriented way wich will certainlly find its way to broader user base.
Filter Forge Review
30/06/09 14:02
an indispensible tool for the graphic and 3D artist
by Albert Kiefer
Recently I received a message via one of my feeds that Filter Forge was finally released for Mac OS X.
Previously only availbe for windows systems I have long eyed the special application with envy. The sheer possibilities of this seemingly small application are endless. As a visual designer this enables me a lot of freedom building up images.
Stand Alone and Photoshop Plug-In
Filter Forge is a procedural texture generator and Image manipulator in one app (or Plug-In) that has a tremendous flexibility. The advantage of the Plug-In is that you can apply filter effects directly to any image you are currently working on in Photoshop without having to resort to pointing Filter Forge to an image explicitly. The other advantage is that you can apply the effects to a selected area.
The advantages of the stand alone version are that you are not bogged down by Photoshop and several windows and that you can start to create your own filters from scratch.
Image Correction and Manipulation
Filter Forge can either do basic to advanced color correction or abstraction on any of your images (just create a workflow and save it with several presets) or it can combine the image information with very complex procedural calculations that turn images into fantastic pieces of abstracted, grunged up or plain funny works of art.


Incredibly powerful texture engine
For me however the most incredible power lies in Filter Forge’s ability to create stunning and versatile seamless textures that are very, very handy to apply as texturemaps in 3D software. The thing is that produral textures are a common sight in any 3D software nowadays but they sometimes generate such complex textures that rendering an animation slows down to a crawl due to time and time again calculating these complex procedurals every frame.
With Filter Forge you can create the same, if not much more complex and convincing textures and, once they are rendered to a tileable image file, you have a file that renders like lightning and even will behave better with anti-aliasing than some procedural noises ‚in app’ tend to do.
But Filter Forge does not simply spit out an image file. It even presents you with the options of generating normal maps, bump maps and specular maps and alpha channels of that same file. This way you have a complete package of images to put to use in you texturing project.
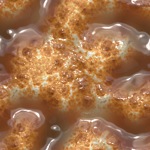
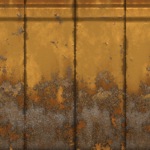

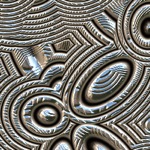
All of the above images are procedural without any additional image input.
Library Magic
When you get Filter Forge and open it up for the first time you cannot even start to comprehend how powerful this app actually is. So first thing I would advise is to rus over to their very extensive on-line libraries and grab presets from several categories. You can spend hours and hours just marveling at the incredible images and textures that are being generated by a very active user community and wich are free to download (you can even do that directly into you running Filter Forge app!)
Multi-core enabled
The node based system that Filter Forge uses to create its magic can bring down a modern computer if things get really complicated (but remember: it’s only once to render the image and then the resulting image renders blindingly fast in your 3D package of choice). So the developers have enabled multi-core rendering. If you happen to have more than one processor driving your machine you can put that extra power to great use here.
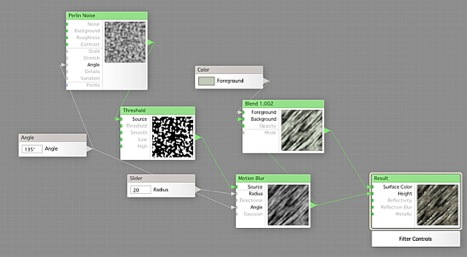
The node based system lays out steps in clear iconic building blocks.
Variations to go
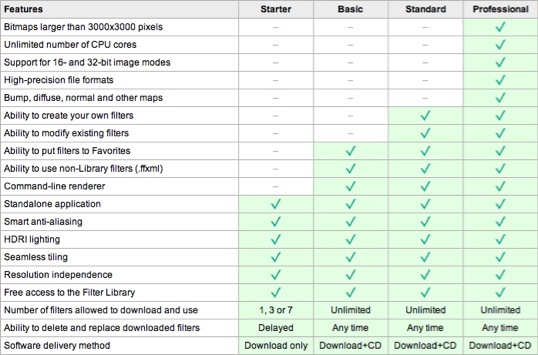
Filter Forge comes in several flavors tailored to your specific preference or budget.
- Filter Forge Starter-1 Edition Mac ($ 9.-)
- Filter Forge Starter-1 Edition WIN ($ 9.-)
- Filter Forge Starter-3 Edition Mac ($ 19.-)
- Filter Forge Starter-3 Edition WIN($ 19.-)
- Filter Forge Starter-7 Edition Mac ($ 29.-)
- Filter Forge Starter-7 Edition WIN ($ 29.-)
- Filter Forge Basic Edition Mac ($ 99.-)
- Filter Forge Basic Edition WIN ($ 99.-)
- Filter Forge Standard Mac ($ 199.-)
- Filter Forge Standard WIN ($ 199.-)
- Filter Forge Professional Mac ($ 299.-)
- Filter Forge Professional WIN ($ 299.-)